
Store Management
Store Management
Section titled “Store Management”Manage store locations, settings, and user assignments.
Stores represent the physical locations where your displays live. Every display belongs to a store, and every user can be scoped to one or more stores. Managing stores keeps your content, displays, and team organized by location.
Store List
Section titled “Store List”Navigate to Stores in the sidebar to manage all your locations. The page opens with:
- Summary stats across the top — Total, Active, and Inactive store counts, plus total Displays. A fifth Needs Attention card appears when one or more stores are inactive or active but have no displays assigned.
- A Search stores… box and Brand and Status filters to narrow the list.
- A Table view / Card view toggle (table view on desktop, card view on mobile).
- An Add Store button in the top-right (admins only).
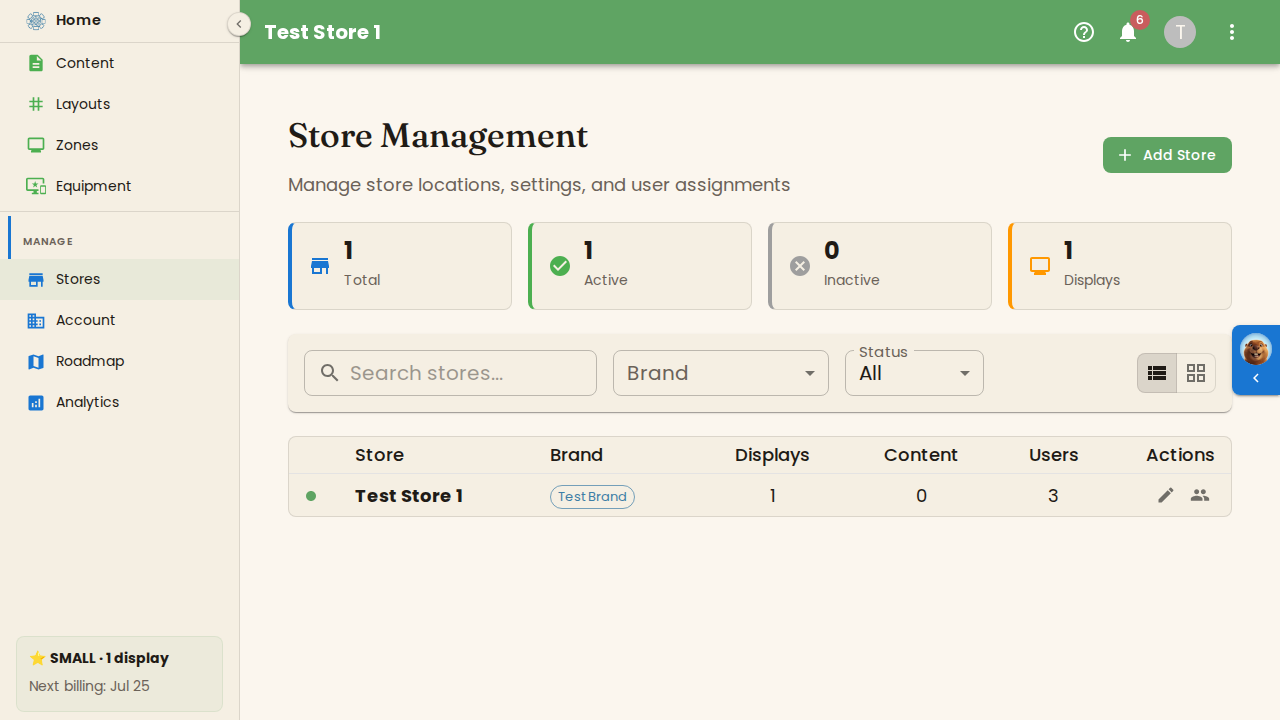
In card view, stores are grouped under their brand name (shown as a chip above each group). Each store card shows:
- Store name (with an active/inactive status dot)
- Displays count
- Content sources count
Click any card or table row to open the store’s detail page.
Store Detail Page
Section titled “Store Detail Page”Clicking a store opens /admin/stores/:storeId — a dedicated page where every field is edited in place. There is no separate edit wizard.
Sections
Section titled “Sections”| Section | Contents |
|---|---|
| Store details | Store name, description, website, and business type — each field edits in place; click a value, change it, and it saves on blur or Enter |
| Operating hours | Operating schedule and timezone, with an inline Edit / Done toggle |
| Address & contact | Street address, city, state, zip, phone, and email — all inline-editable |
| Brand | The brand this store is assigned to; owners can click Change to reassign |
| Usage | Displays count, Content Sources count, and a Users count that opens user management |
| Integrations | Connectable OAuth services (see below) |
| Danger Zone | Accordion (admins only) with a Delete Store action |
The page header shows the store name, an active/inactive status dot, and an Active / Inactive chip. Use the back arrow to return to the store list.
Creating a Store
Section titled “Creating a Store”- Click Add Store in the top-right corner.
- The Store Setup wizard opens with Twig AI assistance and walks you through five steps:
- Store Name — name the store and optionally add a description (for your reference only).
- Brand — assign the store to a brand so it inherits that brand’s kit.
- Industry — pick the business type (Retail, Restaurant, Salon, Office, Studio, Fitness, Worship, Healthcare, or Other). This helps BrandCast suggest relevant content and integrations.
- Website — provide your website so BrandCast can extract your brand colors and logo.
- Hours — set the store’s operating hours.
- Use Continue to advance through the steps and finish the setup.
The new store appears in your store list immediately and is ready to have displays and users assigned to it.
Editing Store Details
Section titled “Editing Store Details”All store fields are edited directly on the store detail page — there is no separate edit wizard. Click any field value to enter edit mode; the change saves automatically on blur or Enter.
| Field | Section |
|---|---|
| Store name | Store details |
| Description | Store details |
| Website | Store details |
| Business type | Store details (expand inline to pick a vertical) |
| Operating hours | Operating hours (click Edit to expand the schedule editor) |
| Address, city, state, zip | Address & contact |
| Phone, email | Address & contact |
Brand Assignment
Section titled “Brand Assignment”If your account manages multiple brands, each store can be assigned to a specific brand. This controls which brand’s design kit (colors, fonts, and tone) the store inherits. On the store detail page, the Brand section shows the current assignment. Account owners can click Change to pick a different brand, or choose No Brand to remove the assignment.
Integrations — OAuth Services
Section titled “Integrations — OAuth Services”Each store can connect external services to unlock additional features and integrations. These appear in the Integrations section on the store detail page.
Available services include:
- Google Tasks — display tasks from Google Tasks
- Canva — import Canva designs into the store Library
- Google Photos — import photos from Google Photos into the Library
- Google Docs — import Google Docs to display on signage
- Google Slides — import Google Slides presentations to display on signage
Each service card has a Connect button to authorize the service (it shows Connected once linked). Use the refresh control beside OAuth Services to re-validate connection status.
Privacy & Security: BrandCast requests only the minimum access required for each service. You can revoke access at any time by disconnecting the service here or through your account settings on the respective platform.
Managing Users per Store
Section titled “Managing Users per Store”Each store has its own user roster. Click the Users count or the Manage users button in the Usage section on the store detail page to open Manage Users:
- Assign New User — pick a user from your account, choose a role (Manager or Viewer), optionally mark them as Primary, and click Assign.
- Current Users — a table of everyone with access, showing their name and role, with an action to remove a user’s access to this store without affecting their account.
Tip: A Manager role scoped to a single store can manage that store’s content and displays without seeing any other locations. Use store-scoped access for regional managers or store-level staff.
Deleting a Store
Section titled “Deleting a Store”On the store detail page, expand the Danger Zone accordion at the bottom of the page and click Delete Store.
Warning: Deleting a store permanently removes the store and all associated data. Move any displays and content you want to keep to another store first.
What’s Next?
Section titled “What’s Next?”- Team Management — Add users and assign them to stores
- Roles & Permissions — Understand what each role can do per store